
Amazon Seller Central

Amazon Seller Central Definition:
Amazon Seller Central is the web interface used by brands and merchants to market and sells their products directly to Amazon's customers. If you have a Seller Central account, you're considered a marketplace or third-party seller.
Amazon Seller Central is hassle-free way to sell on this site is to become an Amazon FBA Seller. This means that all your orders are “Fulfillment by Amazon.” In other words, Amazon handles the shipping, delivery, and, if need be, returns and refunds or exchanges. You don't have to keep or manage inventory either. Using Amazon’s “Seller Central” dashboard, you’ll be able to manage an online business without your own website. It’s a lucrative opportunity — third-party sales account for millions in sales each year. About 50 percent of sales on Amazon are made through third-party sellers.
Table of Content:
Definition
Amazon Seller Central Signup
Approval Product Category
Amazon Seller Central Fees
Amazon Seller Account Check List
8 Considerate Facts
Business Structure
Category Selection
Amazon Seller Account Creation
Amazon Seller Central Account Set Up and Management
Amazon Seller Central Account Dashboard
Amazon FBA Success
Conclusion
Amazon Seller Central Signup For Registration:
You start by going to this link to sign up as an Amazon Seller: https://services.amazon.com/content/sell-on-amazon.htm. or https://sellercentral.amazon.com/

Amazon Approval Category: You do have to fit into one of 20 categories in order to be a third-party seller. Some of the more common categories — that are also profitable — are clothing, healthcare, beauty products, baby products, jewelry, home and garden items, cell phones, electronics… just about anything you’d want to sell is covered. For a complete list go here: https://services.amazon.com/services/soa-approval-category.html.
Amazon Seller Central Fees:
If you sell more than 40 products a month – that’s probably your goal – you’ll pay $39.99 per month, as well as other fees for things like Amazon personnel handling your products. If you sell less, you’ll pay 99 cents per sale, as well as other fees. Individual sellers pay $0.99 for each item sold on Amazon, in addition to variable closing fees ranging from $0.45 to $1.35. Professional sellers pay variable closing fees and referral fee percentages ranging from 6% to 25% (an average of 13%).
Amazon Seller Account Settings -
Necessary Paperwork (Checklist)
You
can manage all of your account information like payment information, business
information, shipping and return information, and tax information using Account
Settings. If you are new to Selling on Amazon, see What you need to know to sell on Amazon.
·
To
access your account settings: Go to Seller Central and click Settings. Click Account Info. See Add, view, and update
your bank account information for more information.
·
If
you want to temporarily deactivate your listings, see Listing status for
vacations, holidays, or other absences.
·
If
you want to permanently close your account, see Close your seller account.
·
Seller
Identity Verification
·
What
you need to know to sell on Amazon
·
The Basics
of Selling on Amazon
·
Update
your seller account information
·
What
is the Individual selling plan?
As the platform continues to take on new sellers who don't always follow the rules, Amazon has had to become more strict in allowing who can sell, what can be sold, and how. Sellers must receive approval to sell clothing, shoes, handbags, automotive items, and many more types of inventory.
Compared
to other business ideas, yes it is easy but it's not
'push-button' as many experts would have you believe (as they pitch you their
$5,000+ training/services to help you). Selling products
on Amazon is a business and the more you treat it like 'your
baby', the much higher chance you will have with success.
After market research, ordering for new products to sale and decided to opening a Fulfillment by Amazon FBA, you’re probably amazing first how to set up your amazon seller store so that you can begin selling your products. Set up your first online retail business Amazon Seller account really simple and you’ll be selling in no time. It’s important to take the time to prepare your store for customers, but once your account is all set up, you can add your inventory and get your store up and running.
8 Considerate Factors
Before start the step-by-step process of setting up your Amazon
Seller account and your Seller Central space, there are following few things
you need to have considerate and completed:
Find out Niche
Product: Figuring out what you’re selling and how you’re
sourcing your product are the most time-consuming parts of setting up your FBA
business. Make sure you’ve already done these tasks before you go through the effort of setting up your account so you
can start selling right away. If you haven’t done this step yet, make sure
you do your research on
what products will help you excel as an Amazon Seller.
Select Your Brand Name: Besides knowing what product you’re selling, you should probably decide on the name of your store before you create your account. Are you going to use your individual name, or do you have a business or brand name already decided on?

Create
Business Account and Tax: Most importantly, you need to
know if you’re going to be creating the account as a business (also known as an
LLC) or as an individual (sole proprietor). Amazon has two different options for sellers. You’ll need to fill out tax forms
while setting up your account.
Social Media Promotion: You just have to focus on promoting and marketing and let Amazon's systems handle the orders, delivery, etc. You have to find the word out about your business and your products. For instance, you could write a blog post with reviews of products in your niche.

Traffic Selection: The
traffic comes to Amazon.com, which are 200 million people per month in just from
the United States. These are ready to buy not everybody will be in the market
for your product
Competitive and Competition (Market Research): It always pays to see what others are doing in your niche. See how they’re pricing their products. What kind of specific products, especially new products and read the positive and negative customer reviews section.
Identify Product
Supplier and Order Placement: You
have to identify product supplier for first delivery consideration to your
customer, Such as Find premium supplier.
Profits Maximization: You may start with one product on
Amazon. But if you want to really make some money, and then you need to expand
to sell a whole range of items. Again, you have to closely look at the market
to see what’s they are selling well and then jump on the bandwagon. It’s also
important to take advantage of the holiday season specially
“Christmas” time.
Business Structure (Sole proprietor or LLC)
You’ll face an important question that will dictate how your
business runs and operates right from the start: would you want to run your
business under your ownership as a sole proprietor or as an LLC (Limited
Liability Company)
Sole Proprietorship: As a sole proprietor you’ll have unlimited liability, this mean
that all assets and debts are owned by you. This puts you at risk because you
will be directly liable in the case of any legal action taken against your
business. If you owe debt larger than your business assets, you could lose
personal assets to pay that debt.
LLC: In the case of an LLC, you would be protected as your business
is an established entity that can be held liable in the case of legal action.
With an LLC, business and personal assets are separate.
Difference between
Sole Proprietorship and LLC: So why would anyone
set up a sole proprietorship you ask? It’s the easiest and cheapest way to
become one of Amazon’s sellers. You don’t have to go through the hassle of
registering the business and establishing business income like with an LLC.
Establishing an LLC generally costs more, and on Amazon it also means you will
be responsible for business fees. Those fees would be nested under the Amazon
Professional Seller Central account, which you would likely choose that option
if creating an LLC.
Category Selection (Professional or Individual):
Exploring your options before you start the process of creating
your account, there are pretty big differences between the two. Either way,
you’ll be able to sell your items and run your FBA business; the major difference has to do with whether you think you’ll be selling more or less
than 40 items per month (and whether you
want to pay
a monthly fee).
Individual Account: The Individual seller plan doesn’t have a monthly fee, and this
plan is pretty appealing if you’re just starting out and in a more experimental
mode with your products…you can start as an Individual first.
Professional
Account: Next Step is to upgrade your account to the
Professional selling plan at any time. There’s a lot of overlap between the two
plans: Both Individuals and Professionals have to pay shipping, referral, and
closing fees, all explained on Amazon’s website. And both Professional and
Individual sellers can list their products in more than 20 categories, but Professional
sellers can add their products in 10 extra categories.
Amazon Seller Account Creation
Before start onto Amazon’s website in the exciting rush to open
your new FBA business, make sure you have these essential items right next to
you:
1) Credit card that
can be charged internationally,
2) Banking
information, such as your routing and account numbers, and
3) Tax
identification information, either for yourself or your business.
Once you’ve got these details, you’ll want to make your way
to Amazon’s home page. Scroll to the bottom of the page and find the list titled
“Make Money with Us.” Then, click on “Sell on Amazon.” It’ll take you to a page that looks like this:
Hope you’re ready to start selling, because that’s the button
you need to click to start the process! Now you’ll enter the “Seller Central”
side of Amazon. Next, you’ll need to create an account. Or, if you’re one of 80 million people who’s already an Amazon Prime member, log in to your
account using the link below the form.
Business email and
Personal email: If you’re someone who likes to separate business and
personal emails, you may want to use a different email than the one associated
with your Amazon Prime account. Since you’re setting up your FBA business using
this login, you’ll start getting emails about your orders and other business
transactions. One thing to note is that for every Seller Central account you
open, it must have a unique email attached. So if you are excited about
starting FBA businesses and thinking ahead to selling your business with us, all of your accounts must have separate emails.
If you don’t already have a business email and you’d prefer to
keep things separate, it’s simple enough to set up a Gmail account just for
your business before you log on to Amazon.
Tax Identification: Once you’ve created your account or logged on with an existing account, you’ll be asked to enter your legal name. Think of it this way: who’s paying the taxes for this business? If you’re setting up your Seller account as an individual, use your name and tax identification information.

Business Address: Once you’ve entered this information, Amazon will ask for your
business’s address. This is also the page where you’ll enter the unique display
name for your business that everyone on Amazon will see. Amazon lets you know
if the name has already been taken.
Billing Method (Credit Card and Bank Information): Amazon will then ask for a billing method, so you’ll need to whip out that internationally recognized credit card and banking information

Card Verification: Once you’re on this screen, they’ll verify the selling plan
that you chose. You’ll see here that I selected a Professional selling plan.
Since you’re setting up a FBA account, make sure to check the box!
Tax Interview (Final Step): One of the last steps in this setup process is entering your tax identification information in a “tax interview” process. Essentially, Amazon needs to register you in their system, because they have to keep track of all the third-party sellers that they cut checks to. The lovely people at the IRS demand this information. As a mandatory step in this process, you’re basically filling out a W-9 form.

During the tax interview, you’ll have to select whether you’re a
sole proprietor or a business. The major difference (besides all the
nitty-gritty details in the paperwork about taxes) will be that sole
proprietors/individuals will use their Social Security Number instead of an
Employer Identification Number as their tax identification number.
Amazon validates and provides you with a W-9 form pretty quickly after you’ve submitted your information. Yay,
technology!
Product Information: The last step in setting up your Seller account is providing general information about your products, but this is optional — you can skip it and fill it out at a later time.
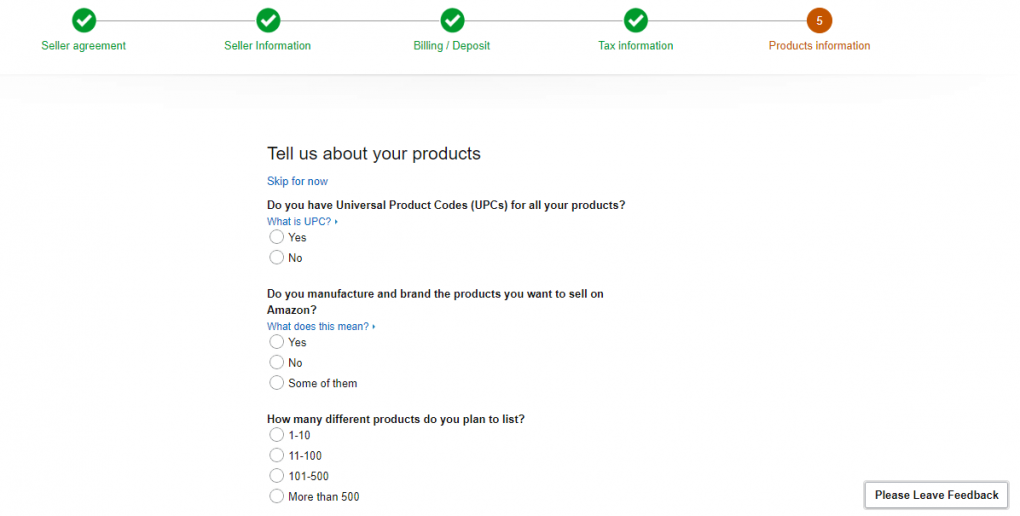
After these 5 steps are complete, your
Seller account is all set up. Now the fun really starts — it’s time to explore
Seller Central.
Amazon Seller Central Account Set Up and Management
Inventory Management:

Seller Central is the space that Amazon provides for you to set
up your FBA business, manage inventory and orders, and so much more. You can reach
Seller Central by going to sellercentral.amazon.com and logging into your account.
Once you start exploring Seller Central, you’ll discover the
different drop-down lists on the upper left side — Inventory, Orders,
Advertising, Reports, and Performance — to familiarize yourself with what these
areas look like.
If you check out the drop-down list for “Inventory,” you’ll see
“Manage FBA Inventory.” As an FBA business - Amazon-fulfilled inventory.
Amazon Seller Central Dashboard (Getting Start):

Product Entry:
When you’re ready to enter your first product, you can select “Add Product” from the “Inventory” drop-down list and follow the steps. Under “Advertising,” Amazon provides you with ideas on how to reach your audience. Below, you’ll see that they’re suggesting in the Early Reviewer Program, where I would send my products to someone and they would provide me with a review based on their experience. (While there are many ways to market your products, like through a Pay per Click campaign.

Performance will probably be one of your most-utilized subsections, and for good reason. Amazon provides you with an Account Health Dashboard that breaks down customer service, product compliance, and shipping performance, letting you see how your business is doing in a more detailed way (rather than basing performance solely on sales).

Finalize Details:
After exploring the major parts of Seller Central, it’s time to
finalize a few details to get your FBA business ready to sell some products.
Seller Central is your domain, so it’s helpful to
set it up with certain administrative preferences before adding inventory to
your store.
First, double-check that all of your information is correct, such as your business’s name, the billing information, and the return method. To find this page, click on “Settings” in the top right corner, and from the drop-down list, select “Account Info.”

The items circled in red are the places you’ll want to
double-check, just to make sure all of the information is correct. If you
changed your mind about your business name, here’s your chance to edit it. If
you want to add another charge method or need to make sure you put your
information in correctly, click on “Charge Methods.” And for “Return Information,” you’ll want to verify that the address of the return location
is where you want it to be; if there are any issues with your product, people
will need your return information, but it better be returned to the correct
place!
On the Seller Account Information page, you can also change your
email preferences, check your tax information, update your business address or
legal entity, and essentially make any changes you’d like on the administrative
side. After checking all this information, return to the Settings drop-down
list and select “Your Information & Policies.” It’s time to tell the world
who your business is and what you’re all about!
Company Logo,
Privacy Policy and FAQ:
Select “About Seller” to provide a brief description of who you are or a blurb about your company — this will be what your customers read when deciding whether or not to buy from you. You can also add your company’s logo, as well as your privacy policy and FAQs.

Settings drop-down
menu:
One of the most important items on the Settings drop-down menu
is “Fulfillment by
Amazon” On the Fulfillment by Amazon Settings page, you’ll
find a whole lot of sections. Take time to peruse through each of the
subsections to learn all about the optional settings, inbound settings, repackaging,
and multi-channel
fulfillment, to name a few.
Repackaging Settings:

It’s especially important to take note of the Repackaging Settings
and the Automated Unfulfilled Removal Settings to make sure they’re set to
your preferred setting — these will affect the inventory you have and how
quickly you can move new inventory, too
Amazon FBA Success: Seller Central may appear complicated on the outside, but never fear — Amazon also makes it easy for new sellers to navigate the space with an extra-thorough “Help” section. Plus, there’s a lot to learn and experiment with in terms of figuring out the best set-up for your situation, so take your time.
Conclusion:
Build Your Brand: You can start about how to build a brand on Amazon. Amazon is unrolling new social media tools like Amazon Posts and
brand-building platforms like Amazon A+ content to make your business stand out
on the marketplace.
If
you want to get a head start, you can always buy an Amazon FBA business from
our marketplace that is already making money month-in and month-out. If that is
something more appealing to you then starting from scratch, then schedule a criteria discovery call with our team schedule a criteria discovery call with our teamand we’ll help match you up with a business that
makes sense for your current skill level.
ABOUT THE AUTHOR

MD MASHUDUL ISLAM
Technology, CONTENT SPECIALIST AND AUTHOR
Md Mashudul Islam
is Technology Specialist. He is working on shoots around the US, Europe, Australia, and
Asia, 30+ countries for work. His passionate about the digital nomad lifestyle
so you’ll likely never find him in one place for too long. Visit
professional LinkedIn Profile to know more.
Thanks.